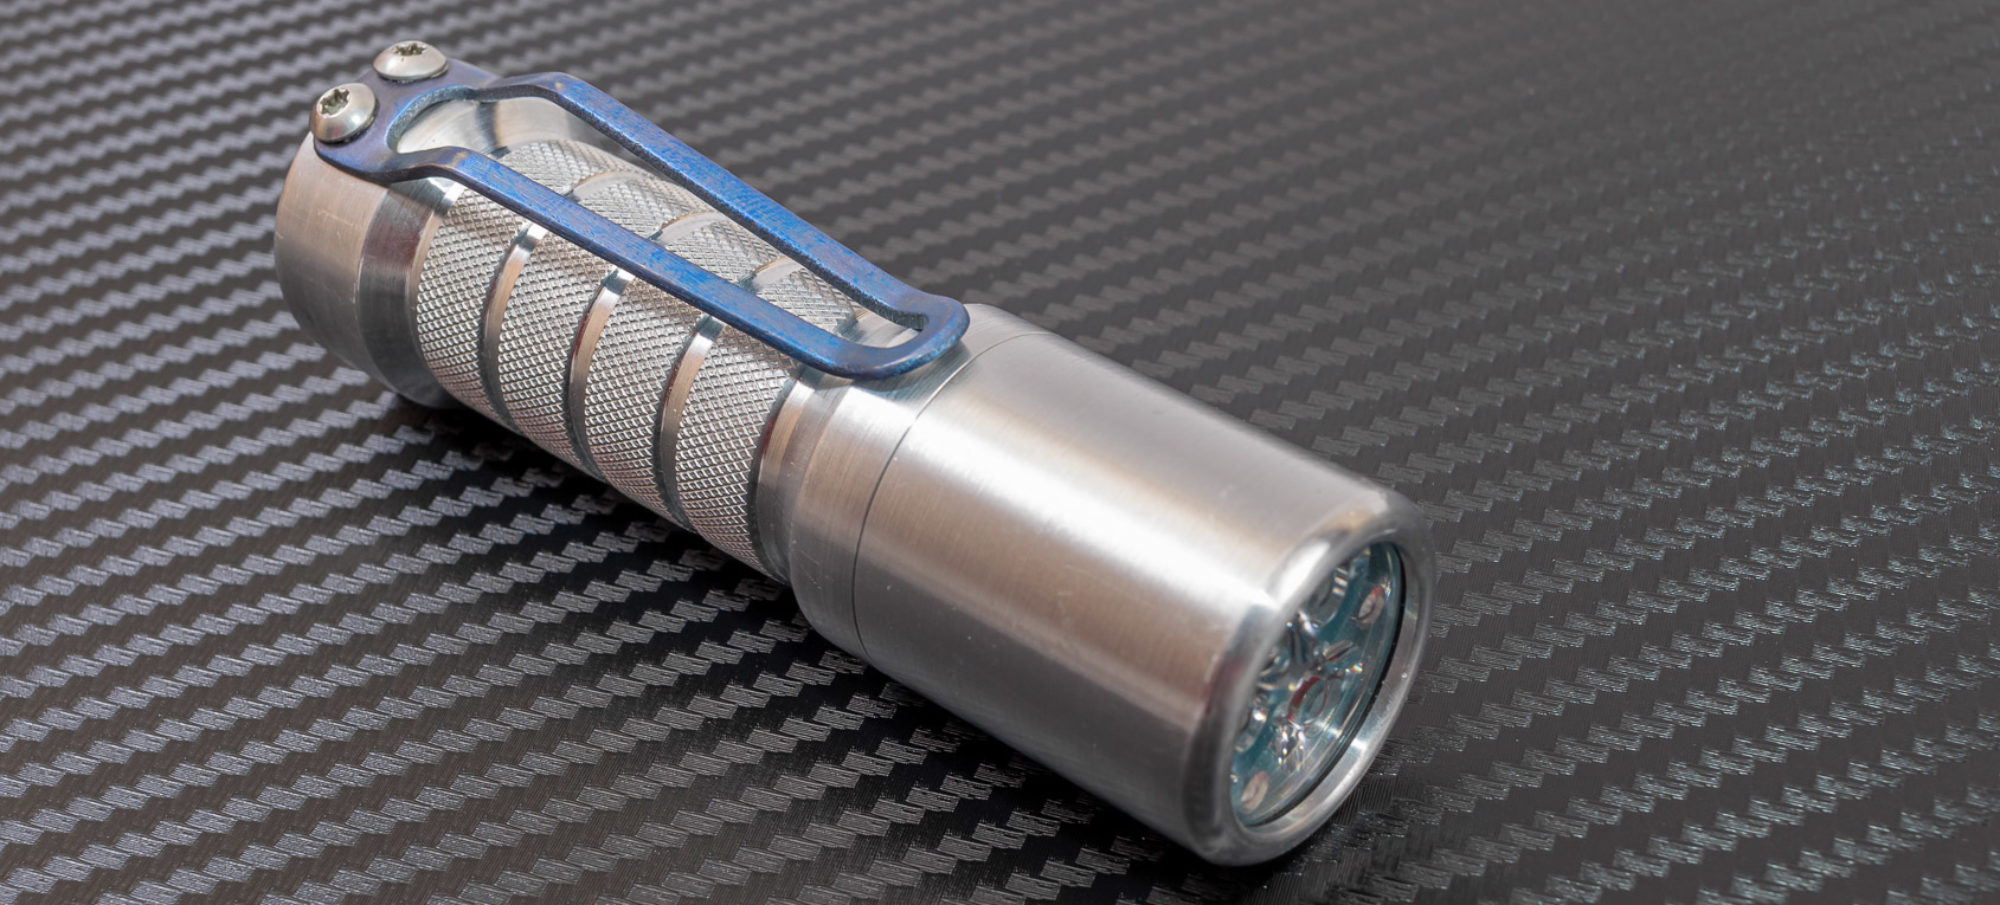
Reylight Quad Dawn Maratac (21700, 4000 Lumens, Cree XPL-Hi, 5000k)

Today I have the new Reylight Quad Emitter Dawn flashlight by Maratac. It’s a CountyComm exclusive light producing 3200 lumens out of 4 Cree XPL-HI LED’s in 5000k and can be powered from a 21700 or 18650 battery. It’s got this really nice dimpled style texture on the body all done in this grey type 3 anodized body. Let’s take a deep dive on this light and show what it’s capable of. 


Watch this review on YouTube: 

**Follow me on Instagram: https://www.instagram.com/liquidretro/ 

Join the Facebook Page: https://www.facebook.com/LiquidretroReviews/ 


Don’t forget to subscribe to my Youtube channel too, I can see that on some of my popular videos up to 75% of you watching this are not subscribed, so make sure you click subscribe now and turn that bell icon on, so you get notified about new videos every week. 


CountyComm is giving my viewers 10% off their order of this light by using the code “LiquidRetro” at checkout. Check it out here if you are interested https://bit.ly/2SqBcTo


Packaging and Accessories

The Reylight Maratac Quad Dawn packaging is very simple. It ships in an orange hard plastic case with foam inside, some extra orings, and a plastic spacer for running an 18650 if you want to. The case is nice to store the light in but great to put other stuff in too. CountyComm is shipping these with a Samsung 40T 21700 battery but no charger. No manual is included but it’s a pretty simple 4 mode interface so you don’t need one. 


Construction

The light is made from 6061 aluminum and type 3 hard anodized in a gray matt finish. Starting at the tail switch, it’s a recessed textured rubber boot with a mechanical switch underneath. It has a satisfying feel and sound too it. The clip attaches at the edge of the light, using 2 purple anodized titanium screws and a titanium clip. I will talk more about the clip in the retention section. The only branding is opposite the clip, and it has the Maratac logo and the serial of the light. This minimal branding is great! 


The body and tail are a one piece design. I really like the almost golf ball like dimpling on the body of the light. CC says this increases the gripping surface by upto 300% over standard knurling, I don’t know how they come up with this calculation but I just like the feel in my hand and different look to most other lights on the market, and it won’t tear up your pocket insides. The head grows in diameter and has 4 tear drop shapes milled into it the length of the head. It’s a design feature that is common on many other ReyLight designs, like the LAN, and Gemini. 


At the front the bezel is raw aluminum to provide some contrast and when standing on the head it allows light to leak out letting you know if it’s on or not. The lens is sapphire, which is great for scratch resistance. Below that is the quad carillo style optic and LED’s. There is a green glow gasket underneath, it’s reasonably bright but definitely not turbo glow. 


Size and Weight

I measured the light at an overall length of 121.78mm, a minimum diameter of 25.5mm on the body and a maximum diameter on the head at 28.2mm. Weight with my 21700 battery is 140.1g. With a 30Q and spacer the weight was 127.6g.

The light is narrow for a 21700 and quad emitter light. Here are a few comparisons to similar quads or 21700 lights. 


Retention

For retention this light has the same pattern Reylight has used on the Dawn and Gemini flashlights. It’s a wide paddle clip that has the popular Steel Flame spacing for the screw holes, so you can upgrade to a skull clip if you like. The stock clip is 1.2mm Thick and quite stiff. It’s a bit of a challenge to get it to clip to my pants pockets. That said it’s very secure and isn’t going to go anywhere once clipped. I like how this light feels in my hand, it’s the perfect size for me and that dimpled texture gives a nice grip.

LED & Beam Shots

The Reylight Quad Dawn by Maratac is using Cree XPL-Hi LED’s in 5000k tint so it fits that classic neutral white tint, but to me it seems on the cool side of 5000k. My preferences in recent years has opted to the warmer emitters but this is nice too. The optic is all flood, and it’s pretty even with no real distortions, not something you see on all quads. The beam has a broad center with a slight corona, and the overall shape is slightly square at short ranges. 

Quad Dawn Beam Shot 

Reylight Krystal Beam Shot 


The middle 2 modes exhibit some PWM, It’s not bad and my eye or camera can’t see it but my scope can. See the example below. 


Heat and Runtime

The Reylight Quad Dawn by Maratac has quoted outputs of 2 lumens, 250 lumens, 1400 lumens and 3200 lumens. I did my runtime test with an Xtar High Drain (42A) 4200mAh 21700 battery because that’s what I had two of. I did a complete runtime in Turbo, which isn’t recommended because of the extreme heat, but it’s how I test all my lights in the brightest possible mode and see where they go from there. On this light it starts stepping down pretty soon after and a 0:2:25 it’s down to 50% relative output. From here it holds itself for an hour  before stepping down again and ending at around the 1:15:00 mark. During this time the light gets super hot, a whopping 78.9C (174F). This is dangerously hot, for both the battery and your skin. Again this isn’t recommended, CountyComm recommends only using “turbo” for 90 seconds and when you do that the light steps down much less and remains a warm but reasonable temp of less then 60C. I tested High only mode and fell a little short of the 2 hour quoted runtime but my battery is also 800mAh short of what the light ships with so I expect it to hit that without issue. 


UI

The UI here is super simple, it’s a 4 mode flashlight, with moonlight, low, high and turbo. Mode spacing varies quite a bit, between 2, 250, 1400, and 3200 lumens. The mechanical button can accept half presses while on to advance the modes and then a full press to lock in on. There are no flashing modes on this light, which I am cool with. The light doesn’t have memory mode.


Pro’s

  • I love the golf ball style dimpled texture on the body, it’s different and functional. Nice grey anodizing here too.
  • Surprisingly light and small for a 21700 quad light.
  • No stepdowns due to thermals mean it stays bright for as long as possible but gets extremely hot.
  • Simple 4 mode interface, no strobe.


Con’s

  • In continuous output in maximum output this gets super hot, Up to 78.4C in uncooled runtime tests. This is too hot to hold safely, so run the light only as bright as you need or can stand.
  • The pocket clip is super stiff, it takes effort to clip onto your pocket.
  • Some rattle with the 18650 adapter but that is to be expected.


Conclusion

The full name of the light (Reylight Quad Emitter Dawn Custom Maratac LED Flashlight + Glow Afterburner) is lunacy, but the quality of the light makes up for it. For a 21700 sized light it was smaller than I thought it would be. The slimness of the tube really helps.


It’s not something I will carry often in my front pockets for EDC for office tasks but you could carry it pretty easily in a larger pocket or back pocket if you wanted. It’s not too big in a front pocket either if you wanted. For me it fits great in the hand and that is only made better with the dimples for grip. It’s a great walking the dog type of light, high at 1400 lumens and the floody beam is more then you need, and with 2+ hours of runtime it is plenty for most people. One more mode between low at 250 lumens and high at 1400 lumens would make it a little more useful I think.

That said on Turbo for continuous use this light is dangerously hot, 78.9C (174F) is burn you hot, that said you I only saw this at the 31 minute mark and I don’t think you will see it in the real world because a sane person would shut the light off or turn it way down as you wouldn’t be able to hold it. I don’t recommend running your light in turbo for so long because it’s not good for the battery either. 

Overall this is a nice light at a fair price. I enjoy it and am glad I have one. It’s easy to recommend and is a nice size too. Remember these are limited to only 500 lights and are only being sold through CountyComm, so check the description below for a link to their website to pick one up if your interested. 

CountyComm is giving my viewers 10% off their order of this light by using the code “LiquidRetro” at checkout. Check it out here if you are interested https://bit.ly/2SqBcTo

Jetbeam TH20 Guardian (2020) Review (3980 Lumens, XHP 70.2, 21700, USB-C)

The Jetbeam TH20 Guardian is an updated version of the previous popular TH20 Tactical flashlight. It’s rated for 3980 lumens from a Cree XHP 70.2 LED and a 21700 battery. It features onboard USB-C charging and has a powerbank function. Thanks to Jetbeam for sending it to me to review. 


Watch this review on YouTube:  

**Follow me on Instagram: https://www.instagram.com/liquidretro/ 

Join the Facebook Page: https://www.facebook.com/LiquidretroReviews/ 


Packaging and Accessories

Packaging is standard Jetbeam hanging design with a nice photo of the light on the front and stats on the back. Inside accessories include the light, a 5100mAh 21700 battery, a belt holster, wrist lanyard, the USB-C OTG cable for charging and using as a powerbank, and then some nice spare red orings. Paperwork includes the manual, warranty card and COA. 


Construction

The TH20 is a solid well built light all around. Starting at the tail cap it has 2 large square ears that protect the button and paddles well, and allow for a place for the lanyard to fit. The light will tail stand but it’s not very stable when doing so. The knurled areas on the tail and body are on the smoother side but the milled areas on the light and heatsync give you an area to lock into. 

Threads on the inside are anodized, square cut, beefy and really smooth. Other manufactures take note, this is how it’s done. The tail cap has dual stiff springs, but the head only has a brass post, a little surprising for a tactical light. No issues with vibration though. 

The head section has a section that looks like heatsyncs, I think it’s more style though, The front bezel seems to be glued in place, I can’t get to move, It’s short but has large crenulations allowing light to spill out. The antireflective coated glass underneath is thick and well protected. Under that is the deep orange peel reflector and the large Cree XHP 70.2 LED. 

Size & Weight

I measured the overall length at 161mm. Maximum diameter on the head was 40.21mm and minimum diameter on the body was 29.5mm. The weight I measured with the battery, was 267.3g. This is a large light, no ways around that. See the photo below for some photos of similar 21700 sized lights. 


Retention 

This isn’t an EDC light to put in your front pants pockets, instead you have a holster option that the light comes with. It comes with a nylon holster, with a button belt loop and no Dring. The material here is nice but the stitching is all single stitch and it it’s not a premium feel.

LED & Beamshots

This light is using a Cree XHP70.2 LED in cool white. No tint data is given but it’s definitely cool white and has the characteristics of a XHP70.2 LED. So that means it has some beam distortion in the center, of a corona donut and then tint shift across the beam. It’s more a flood but the beam isn’t even, so I would call it on the floodier side of a typical flashlight beam. Definitely not a thrower.

The light has 4 solid on modes and then strobe.

  • Turbo 3980 Lumens
  • High 1500 Lumens
  • Medium 350 Lumens
  • Low 25 Lumens

No ratings are given for strobe but I would guess it’s equivalent to high or turbo.


Runtime & Heat

I am skeptical of the claimed 3980 lumens, at least that it can sustain it for any time. In my runtime graph here I see about 20 second before the light has stepped down. At this point it can sustain this mode for about 10 minutes before stepping down again due to thermal constraints with the maximum temp it sustained was 40.5C. Total runtime ended up at 2:26:00 but instead of shutting off the light ran for several more hours at basically moonlight mode. I stopped the test at 5:35:00. LVP kicked in at 2.946V.

UI

UI here is quite simple. You have a large mechanical button on the tail end of the light covered in a large silicone switch, it’s quite stiff, you won’t accidently press it, but it is loud. Next to it on both sides are metal paddles. When the light is off, the paddles give instant access to the strobe/sos mode of the light in a momentary manor. When you press the main button on the light the paddles give you mode options give you mode selections, with memory. The easiest way to lock the light out is mechanically by just turning the tail cap slightly.


Recharging

The TH20 offers charging via USB-C, but doesn’t support C to C charging. It features USB-A to USB-C which seems to be all most flashlights offer. Recharging the included the 21700 5100mAh battery from LVP to full took a total of 5 hours even, with peak charging rate 1.87A. The curve is a little abnormal but no big concerns with a battery this size. My one complaint is the LED light that gives the charging status is very close to the port, and combined with the port cover it can be hard to see depending on the cable you’re using. Charging stopped at 4.149V. 

The light can also be used as a powerbank. It comes with a USB-C to USB-A Female adapter cable that can be used to charge your phone or other device from the light. It can also charge a device like my phone with just a USB-C to C cable. I did a discharge at 2A, but when doing this it didn’t seem to step down gracefully like I would expect or it could be my equipment, not many lights do the powerbank feature. 

Pro’s

  • I like the warm gray color of the anodizing
  • Feels well made, and beefy, buttery threads.
  • The battery bank feature is nice in a pinch.


Con’s

  • Turbo is too short only lasting about 20 seconds.
  • Definitely has some distortion in the beam from the lens and LED.
  • It’s big, and on the expensive side.
  • While it tail stands, it’s not stable when doing so.


Conclusion

I don’t have a ton of use for a light like this in my daily uses. It’s large, heavy and turbo is too short to be useful for me on my example. I do think the tail design is pretty decent for direct access to strobe in a tactical situation but 3 simple light modes plus turbo for your solid modes. I wish turbo lasted longer then 20 seconds, it would be useful in tactical and non tactical situations. 


I love the color of the anodizing here, it’s gray brown anodizing, nice to see especially on a tactical light. The light is also very well built from what I can tell. Solid, and the rear switch takes quite a bit of pressure to push. If you need a solid well built tactical light thats in that middle ground between a flood and thrower then this fits that need, but isn’t going to be your best general purpose light in my opinion. 

Take a look at the TH20 Guardian 2020 at BatteryJunction https://www.batteryjunction.com/jetbeam-th20-guardian-v2.html

VapCell S4 Plus Charger Review (12A of Speed! + Other Features)

Today I have a newer charger from Vapcell, the S4 Plus. This is truly a fast charger as it can charge all 4 bays at a maximum of 3A for a total of 12A. Speed is selectable too. It charges lithium ion batteries including protected 21700 sized, as well as NiHM cells as has a few other features I will talk about further on in the review. Thanks to VapCell for sending this to me to take a look at and review. 


Watch this review on YouTube: 

**Follow me on Instagram: https://www.instagram.com/liquidretro/ 

Join the Facebook Page: https://www.facebook.com/LiquidretroReviews/ 


Packaging & Accessories

This is the updated charger that came out earlier this year. The changes are that the display is always on, the battery capacity in mAH is showend when fully charged, the cutoff voltage for lithium ion batteries is now 50mA when charging at 250mA or 500mA (good for small cells), The testing capacity feature for NiHM charges the battery, discharges and then recharges instead of leaving it discharged. 

The package is a nice bifold box with printing on the outside showing the charge, showing what size batteries it charges, chemistry etc. Inside the charger was wrapped in bubble wrap and a generic 12V power adapter was included with a US plug in my case and a 5.3mm barrel inside.


Construction and Specs

Design and construction here are pretty standard for a charger, it’s pretty utilitarian in design. Construction seems solid with no creeks or cracks when twisted. I measured the length at 172mm, width at 115mm and depth at 36mm. Max charger expand size was 76.2mm which is great this means your protected 21700 batteries should fit, and there are not a lot of chargers that can say this. The spring loaded bays are pretty smooth too. There is no fan in the charger but there are some vents, when charging at max speed it gets warm but nothing to be concerned about. The screen here is fairly large at 78mm x 32mm. It’s a dark blue LCD with backlit silver white numerals. 


My findings/UI

The charger has 4 main modes Charging, Discharge, Capacity Test, and Repair.


I am going to focus on the charging function and talk briefly about the others. Charging has 2 modes manual and auto. In Auto mode the charger picks the most appropriate charging rate for the cells measured resistance. You can override this to a degree if you press and hold the current button for 5 seconds, although there is some margin of safety built in for smaller cells so you can’t pump them full of power too quickly.  In manual mode you click the current button to increase the charging rate in 250mAh and 500mAh increments. In my tests the charger stopped charging a lithium ion battery at 4.185V and a NiHM at 1.495v. When fully charged the charger plays and audible tone.

To switch between charging bays hit the display button, same with the modes. The display shows the battery charger percentage, current voltage, internal resistance, amount of power that’s gone into the cell, time elapsed, temperature, and total power in watt hour. 

Discharge allows the cells to discharge down to 3.0V  Capacity test mode will charge the cell up to full, discharge, and recharge measuring the power going in and out each time to get a good measurement of the cells capacity. Repair is useful for batteries that have gone lower then what’s safe, it very slowly and carefully applies power to the cell to try and bring it back to life. 

There is also a USB out port on the top of the charger that can be used as a powerbank to draw off the cells when inserted. This works when you insert a lithium ion battery in cell 1 and there isn’t AC power plugged in. What I wish is when AC Power was plugged in it did output the same 5V 1A of power so you could say plug in and charge your phone or a light that had built in or magnetic usb recharging. 


Pro’s

  • Auto and Manual switch
  • Ability to choose charging current during charge cycle in both modes
  • Speed!


Con’s

  • Manual could be more clear, but it’s not overly hard to use.
  • One feature I would like to see on a higher end charger is a storage feature
  • It would be nice to be able to turn the tone off when fully charged for overnight charging.


Conclusion

Overall this is a nice charger that does almost everything I want in a charger for flashlights and other electronic devices. It allows me to charge my NiHM and Lithium ion batteries and select the charge rate in 250mAh steps, up to 3A per bay. It has an automatic and manual mode too. It will charge all 4 bays at 3A if I am in a hurry and have batteries that support that. It can discharge batteries fully, it will run capacity tests to help me judge if a battery is healthy or needs replaced. It supports long cells too which is important for those protected 21700 sized batteries that are increasingly popular in the flashlight world.

The one thing I wish it had a storage mode, this is one thing I like to do on my lithium ion cells when I know I won’t be using them for a while, it drains the cells down to around 75-80% as that’s where they are the most stable for long periods of time. 

I have no hesitation recommending the Vapcell S4 Plus V2 charger here. It’s fast if you want that, it’s slow if you want control, and it fits all the most common flashlight sized batteries in use today as well as the common household sizes too. 

Pick up the Vapcell S4 Plus on AliExpress at https://www.aliexpress.com/i/4000249374391.html

Olight Warrior X Turbo Review (1100 Meters of Throw, 21700 Rechargeable Battery)

Today I have Olights new thrower flashlight, the Warrior X Turbo. It’s capable of 1000 meters of throw on 1100 lumens and 250,000 candella. It has an Osram LED, and is compatible with the pressure switch from the Olight Odin. Thanks to Skyben on Amazon for sending this to me to look at and review.


Watch this review on YouTube: 

**Follow me on Instagram: https://www.instagram.com/liquidretro/ 

Join the Facebook Page: https://www.facebook.com/LiquidretroReviews/ 


Packaging & Accessories

I won’t go into much detail here but the Warrior X Turbo has great packaging, arguably Olight has the nicest packaging in the production flashlight world. The light comes currently as two colors, you have the black model that I have here and then Olight does offer a limited production gunmetal gray as well. As a base package the light comes with a 5000mAh proprietary 21700mAh battery. Fun side note I will link to a video another flashlight reviewer did of how they make these batteries. You also get the latest generation of the MCC charging system, a Tactical Grip Ring (TGR), pocket clip, anti roll ring, lanyard, and a nylon holster. 


Construction

The Warrior X Turbo takes a lot of the design cues from the Olight M2R Pro, in the tail cap and body, adapting them to the larger thrower platform. Overall build quality is great for a production light.  First the more aggressive tail button is here, which does allow the light to tail stand but it’s not the most stable when doing so. The tail is also compatible with the locking remote switch from the Olight Odin so if you have that it works here great. Inside the tail is a spring loaded contact internally. 


Threads on the body are anodized, nicely greased and have a double oring system, to interface with the anti roll ring and the TGR. I will talk in detail about the clip in the retention section. The grip on the body is the same as what was on the M2R Pro, a more aggressive triangle, and has a few flats milled in for labeling. 

The head is glued to the body and really grows in size to accommodate the large smooth deep reflector. I like the relief that’s milled in to give it some more style and save weight. The front bezel is beefy with large solid crenulations that allow light the light to stand on its head and for light to spill out. It’s not glued in place and can be removed with some force. This does effect the beam shape on the outer edges. The lens is large and anti reflective coated.


Size & Weight

I measured the length at 159mm, maximum diameter at the head was 58mm, minimum diameter on the body was 26.2mm. Weight with the battery, clip, standard anti roll ring came in at 296.1g. Here are a few pictures of the light with a few similarly sized lights you might know. 

Retention & Grip

You have a couple of retention options for the Warrier X Turbo, it does come with a captured pocket clip, but it’s 38mm from the top of the light. That’s ok because with the size of the head here, your not going to be EDCing this in a pocket. The captured clip is nice, it won’t rotate because of an extra tab in the clip and on the light and anti roll ring. 


The stock anti roll ring allows you to use the standard cigar style grip without problems, but that can be a little uncomfortable so Olight includes a Tactical Grip Ring (TGR) that’s a softer silicon like material that slips on in its place. 

Other options include a lanyard that’s included, and the included holster thats purpose built for this light. It has a velcro belt loop and plastic D ring. 


LED & Beamshots

Olight doesn’t say which LED is in this light officially, but they do list the tint at 6000-6700k, and by looking at it my guess is it’s one of the OSRAM models we have seen in other popular throwers. I wish they would list the LED they are using like almost every other manufacturer does. It’s a cool tint but not blue. The beam has a small but very intense hot spot, possibly one of the tightest I have had in recent times. There is a spill but it’s very minimal, only a few percent of the center, and there is some distortion on the edges from the shape of the outer bezel that’s noticeable at short range. I didn’t measure any PWM on this light on either mode.


Runtime & Heat

The ability on the Olight Warrior X Turbo to sustain it’s turbo output was better then I expected. From start to full and stable step down was right at 9 minutes, and it stayed above 80% relative output for the first 6 minutes. At that point it was running at 50% relative output for 1:45:00. Total runtime was just shy of 3 hours. The good news is with such a tight beam even at the lower output throws pretty well. When the power level reaches 20% the light starts to vibrate every 5 minutes to let you know, when it’s below 10% it will vibrate every minute, and below 5% it will vibrate every 10 seconds. You can’t miss it especially if mounted on a firearm. Maximum heat I saw was 48C at the 9 minute mark. LVP was measured at 2.95V.

UI

The UI here is super easy, it’s a 2 mode light with momentary and full on tactual switch. Low is rated for 150 lumens and you can use it in momentary if you half press the button and hold, or a quick have press will lock it on. A full press gives you full power 1100 lumens before step down and a quick press will lock it on, or a full press and hold will work in momentary. It’s the same UI we have seen in other tactical Olights with a rear switch. This light also works with the pressure switch from the Olight Odin.


Recharging

I had a little bit of trouble recording the graph with the Warrier X Turbo with my equipment due to the spikes along the curve where the current drops very near zero which tricks the measuring tools, but overall charge time here was 5:30:00, and the maximum charge rate I saw was 1.92A. I measured the full battery at 4.172V. No concerns with the charging but I will have to look for a firmware update for my equipment. 

Pro’s

  • Long runtime for “Turbo” Nearly 10 minutes. 
  • Great build Quality
  • Despite being cool white it’s not obnoxiously blue in tint
  • Options to mount/cary/activate


Con’s

  • Tail magnet is only for recharging & the pressure switch, it’s not strong enough to hold the weight of the light.
  • Proprietary Battery
  • On the pricy side
  • Two modes are ok, 3 might make it a little more useful for more then a weapon light.


Conclusion

The Warrior X Turbo is a nice more compact thrower from Olight. It has almost as much power as the much larger, more expensive Javalot Pro, but in a size thats easier to use, and carry on your person. While this is designed as a weapon light with the compatibility with the remote pressure switch and to beagle to be mounted on a weapon, it also works pretty well as a super easy main thrower. To me the long 6-9 minute runtime on Turbo is hard to beat in many other thrower style lights in this price category. 


It’s an Olight so it has the usual caveats, like the proprietary battery, and the cooler tints. If you are less sensitive to those things I can recommend the Warrior X Turbo as a pretty sweet well built thrower.


Get the Warrior X Turbo in Black on Amazon at https://amzn.to/32ntwHs

Get it in Gunmetal Gray at https://amzn.to/3hpK7yz

Thrunite T2 vs Seeker 2 Pro Comparison

See my full reviews of these two lights below.

Thrunite T2 https://youtu.be/5Apvie0OZRg

Olight Seeker 2 Pro https://youtu.be/O3x90cZEMhw


Pick up these two lights

Thrunite T2 Neutral White https://amzn.to/3jVEcUm

Cool White https://amzn.to/30gZeVE

Olight Seeker 2 Pro https://amzn.to/2JqRgRR

Klarus GL1 Review (600 Lumen, Small weapon light, Micro USB)

Today I am taking a look at Klarus’s first Pistol light the GL1. It produces 600 lumens for 1 minute, has an adjustable rail to fit a variety of different sized pistols and is MicroUSB rechargeable. Thanks to Klarus for sending this to me to review. 


Watch this review on YouTube: 

**Follow me on Instagram: https://www.instagram.com/liquidretro/ 

Join the Facebook Page: https://www.facebook.com/LiquidretroReviews/ 


Packaging & Accessories

The GL1 comes with a retail hanging box, and it’s basically what you would expect. It does have a runtime chart on the backend. Inside you get the GL1 itself, a MicroUSB charging cable, and a manual. You also get a replacement rail piece and a couple of small screws to lock it down once get it in place for your firearm.


Construction

The GL1 is made from aluminum and IPX6 water rated. It’s a one piece design and fairly slim up front with it getting a little wider as the taper flares out to the back. The front has a fairly deep bezel to protect the lens. On the right side (when mounted) it has a to show an LED, useful when charging, and to give power level indications. ON the bottom is the MicroUSB charging port covered by a silicone cover. Unlike the Olight it’s non magnetic which some will like.

At the back you have two plastic switches that hinge down slightly to turn on. There is a small rubber piece here to give you some give. It’s fairly stiff and at least for me on the glock platform it’s a littler further reach then the Olight PL-Mini 2. What I don’t like is the contour they have chosen for these buttons. For me I find the steep angle uncomfortable because my finger hits the sharper angle using less of the available finger pad to press the button. It works a little better if I come in from the top/side and not directly from top. I think I may file these down a little for better ergonomics.


Mounting

The GL1 uses a more traditional screw mounting system and a spring loaded mount. You can loosen the screw by hand or with a coin or spent casing and then push on it to expand the jaws of the pickitniy rail section. The rail piece is adjustable. It slides on a stepped plastic track. The little rail section is spring loaded so once you lock it onto your firearm it won’t go anywhere. Its a mounting system that works pretty well, it’s a little slower than the Olight PL-Mini2’s system especially when switching between guns but overall it’s a pretty good design.

As far as holster options I know of no one yet supporting the GL1 to buy something off the shelf. This means if you do want to use this on a carry gun, you will need to have something custom made. I think it would be super smart for light manufactures to partner with a holster manufacture in advance or come out with something on their own when lights launch. 


Competition

The Olight PL-Mini2 is the light that’s the closest competitor in basically all stats and even the size. As you can see from the photos here they are very similar looking from the front with the Olight having a slightly larger diameter bezel. The differences is the mounting systems, with the Olights being quick disconnect and a little easier to use. For comparisons of the beam be sure to check the video version of this review.

Olight on the Left, Klarus GL1 on Right


LED & BeamShot

The GL1 is using a Cree XP-L2 HD LED in cool white and powered by an internal 260mAh liion battery. No exact tint data is given but it’s not super cool. The LED sits behind a smooth fairly small deep reflector. 

The beam quality here is good for it’s intended purpose. It’s fairly spotty but the focal point is medium size. There is a good amount of tint shift from the emitter in the center with it being warmer in the middle the the edges. The Olight throws just slightly further according to the stats but to my naked eye I can’t tell a difference. 


Heat and Runtime

The GL1 produces it’s maximum of 600 lumens for right at 1 minute and then starts stepping down from near 100% relative output to 10% over the next 11 minutes. It was at 2:10 we see maximum heat at 35C which is fine. The next 50 minutes or so the light maintains that 10% and then the light is running at near moonlight outputs for the next 2 hours. Output here was a bit disappointing since it lost so much output so quickly. While most firefights won’t last very long I want more then 12 minutes of more then 60 lumens and the last 2 hours are near useless. It’s possible I have a bad battery here but I would rather see a more regulated driver and a few more step downs to better control things. 

UI

UI here is easy and straight forward. There is one mode, on with the light. Both sides switches work the same on the light. A quick press locks the light on. If you press and hold the light comes on in momentary mode. Strobe is available if you click both the left and right buttons at the same time. 


Recharging

The GL1 uses a a 650mAh lithium ion battery internally that’s sealed in the light. The bad here is that it’s non replaceable but that’s to be expected on a light of this purpose that’s so small. Recharging is accomplished via a MicroUSB port on the bottom of the light. While slightly less convenient the Olights Magnetic system the pro is that it’s a standard cable and easy to charge pretty much anywhere. It’s a trade off I will gladly take.

I measured recharging as taking just 56 minutes and the maximum speed I saw was just under 0.3A so a very safe charging speed for this size of battery. On the side of the light there is a LED that will be red when charging and green when charged.  

Pro’s

  • MicroUSB recharging means no proprietary cables needed here.
  • Strobe is available if you want it.


Con’s

  • 1 minute of 600 lumen output I wish was a bit longer
  • No holster options are on the market that I could find.
  • Actuation buttons need revised ergonomics


Conclusion

My conclusion is the GL1 is a good first attempt from Klarus on a pistol light. Physically they did a great job, I think. It’s not really much of an original design but it’s enough to be different. The mounting system works pretty well for not being a QD mount. I do wish they would rethink the ergonomics on the rear buttons a bit for their future models.

Performance here needs a bit of work. A more regulated driver with stepped modes is important here, A shorter runtime is ok if the light produces more light while doing it, because we have to remember the use case here, you’re unlikely to have a pistol light in use for hours at a time. It’s much more likely to have it out for minutes at time. 


I give this light a pass as it’s better then other brands first attempts at a pistol light. The use of MicroUSB here over a proprietary cable is smart. The UI is good and simple for it’s purpose. Lack of holster options will prevent this from being a cary or duty light but that won’t prevent it from being a good companion for a night stand or desk gun. It will be fun to watch where Klarus goes from here with their GL series of lights. 


Pickup the Klarus GL1 at https://klaruslightstore.com/products/gl1-pistol-light-600lm-rechargeable-compact-and-solid-built?_pos=1&_sid=e33c4603b&_ss=r

Thrunite T2 Review (3757 Lumens, XHP 70 LED, USB-C, 21700)

Today I am taking a look at Thrunite’s newest model, the T2. It’s super floody light, producing a whopping 3757 lumens out of a Cree XHP 70 LED, a 21700 battery, and is rechargeable with onboard USB-C. Thanks to Thrunite for sending it to me to review. Let’s take a closer look. Be sure to see Thrunite’s deal on the bottom of the page for the T2.


1a


Watch this review on YouTube: 

**Follow me on Instagram: https://www.instagram.com/liquidretro/ 

Join the Facebook Page: https://www.facebook.com/LiquidretroReviews/ 


Get the Thrunite T2 on Amazon at the links below. 

Neutral White https://amzn.to/3jVEcUm

Cool White https://amzn.to/30gZeVE


Packaging and Accessories

Packaging here is Thrunites standard good quality brown cardboard box with minimal information. The side lists the model and emitter. Inside the light is protected well with foam. Accessories include the light, a 5000mAh Thrunite branded button top 21700 battery, a nylon holster, USB-A to C charging cable, 2 extra orings, a spare charging port cover and a branded lanyard along with a manual. 


Construction

The T2 shares many similar visual features to the smaller Thrunite T1 I reviewed earlier this year. The T2 is made from 6061 aluminum and has a fairly flat tail cap, that is non magnetic, but has a place milled in the side for a lanyard. The tail section and body are a one piece design. The clip only attaches at the tail and is non captured. The body section has a rectangle/rib pattern milled in oti. It’s similar to the Olight M2R which is a competitor light. The T2’s millings are deeper and the rectangle sections are a little larger. It’s a nice amount of grip.

Threads on the body tube are anodized, square cut and nicely greased. Inside the head it has a single brass post up front to fit the proprietary battery. On the outside there is a silver metallic button covering the eswitch with a hole in the middle for the LED indicator. The sides have some milled fins in them. Opposite the button is the silicone cover for the USB-C charging port. I had no trouble here with access to any of the cables I tried. The port is nicely recessed and out of the way.

The aluminum bezel has a grey accent that’s slightly tapered. Inside is a AR coated piece of glass, a wide but very shallow orange peel reflector and the giant Cree XHP 70 LED. 


Size & Weight

I measured the length at 112mm and maximum diameter on the head at 30mm and minimum diameter on the body at 26mm. Weight with the included battery and clip was 167.8g. 


Comparison

The light that i will be comparing this to is the Olight M2R. Now the M2R is a little more tactically focused but quite similar in over all size. The T2 is shorter in overall size and hardly grows in diameter. That said the M2R does have a bit more reach. The T2 seems to sacrifice it’s throw performance for the overall length of the light in the hand.

Retention

The T2 comes with a basic nylon holster, with a Dring and belt loop. The T2 fits inside just fine. You also have the option of a branded lanyard. These are basic options but do the job just fine. The T2 has as very deep carry pocket clip that only attaches at the tail of the light. It bends out and then up almost flush with the tail but on my example here that upper loop is hard to attach onto a pocket due to the step and small amount of space up top. Other than that it’s a decent clip and once you get it down over your pocket lip it carries well for a 21700 light.

LED & Beamshots

The Thrunite T2 is running a Cree XHP 70 LED and is a available in cool and neutral white. I have the neutral white and it has a bit fo green to it, not uncommon for a Cree emitter. It’s a big LED in a very short and wide reflector. The result is a very floody beam with a good amount of tint shift unfortunately. At 

When the light is dropped on it’s tail it flickers slightly but stays on. I didn’t detect any PWM with my oscilloscope. 

Official Outputs are listed as the following.

  • Firefly  – 0.3 Lumens
  • Low – 30 Lumens
  • Medium – 366 Lumens
  • High – 1712 Lumens
  • Turbo – 3757 Lumens


Heat & Runtime

With big output numbers from a big LED comes heat and output stepdowns. Turbo on the T2 started to step down at 1:10 and then ran at 38% relative output till the 8 minute mark, stepping down another 10%. FL1 was at 3 hours 12 minutes. Total runtime was 3hr 20 minutes. Peak heat was 49.9C at 1:30

I did a bit of comparison to the Olight M2R Pro also running a 5000mAh 21700 battery and you can see the Olight has a little brighter mid range but ends about 5 minutes shorter. Overall both lights are pretty comparable in terms of runtime even though their beam patterns are really used for different purposes. 


UI

The UI on the T2 is what Thrunite uses on most Thrunite and Wowtac models. Long press to go to Firefly, single click to go up in modes from L, M, H, and double press to go to Turbo. Triple press to go to strobe. There is a memory mode on all normal modes, and a lock out if you press and hold while the flashlight is off. Mode spacing here could be improved, with just 3 modes you see some big steps up, Medium to High is 366 to 1712. I would like to see another mode in the middle.


It’s kind of a bit of a shame they didn’t decide to use the T1’s ramping mode as I liked that quite a bit. For a more high end light like this, it’s almost becoming the norm to have a stepped and ramping mode that the user can switch in and out of. 


Recharging

The Thrunite T2 has onboard USB-C recharging, and it ships with an A to C cable. They advertise the light as having fast charging but doesn’t really say what that is. I had my hopes up that it would be compatible with C to C  charging via USB-C PD but at least in my testing that doesn’t seem to be the case. Charging the 5000mAh battery from LVP at 2.948V to Full at 4.199V took 3 hours 30 minutes. Maximum charging rate I saw was right at 2A. It didn’t ramp up but instead started right at 2A and then ramped down as the battery filled. The LED Indicator on the button displays power levels in real time. Greater then 21% is blue, between 11-20% red, and flashing red is less then 10% power remaining. When charging they go red and then blue when charged.

I was a little worried about the included 5000mAh battery as it has both the positive and negative terminals on the positive side, it looks identical to the battery Olight uses in the M2R Pro and in fact the Olight and Thrunite batteries are interchangeable in either light. What’s a little strange here is that Thrunite doesn’t have a contact point in the head for that negative terminal on the top of the battery so a standard button top 21700 works and charges in this light just fine. 


Pro’s

  • Compact High Lumen Flood
  • Neutral white tint is available
  • Even though it looks like a proprietary battery, standard batteries charge and work just fine.


Cons

  • Not USB-C to C Compliant, no USB-C PD support
  • Pocket clip need a little bit of tweaking to fit most pants for deep carry
  • Mode spacing is spaced out quite a bit. 0.3, 30, 366, 1712, 3757 lumens. 
  • Timed Step Down


Conclusion

The T2 a pretty good all around floody light with a lot of output from it’s Cree XHP 70 LED. It’s nice to see Thrunite continue to offer tint options on their lights. I find the overall design here a little boring to look at but in this case it’s form over function and functionally it’s pretty good. 


I would make a few small changes on a revised model if I could, another mode between medium and high to split the difference between 366 lumens and 1712 lumens. I would tweak the top loop of the clip to allow for it to fit over thicker pants easier, and I would make it compatible with a USB-C to C cable so it could be charged with many laptop and smartphone chargers. The USB-C to C cable is the one universal cable to make your life easier, we are just not there yet with most flashlights. It would be nice to see active thermal management on a light in this price range instead of a timed step down.


The battery here is really interesting, that Thrunite went to the expense of putting that negative contact on the positive end but doesn’t use it on this light. It makes me wonder what they might have coming out in the future. It’s nice here that you don’t need a proprietary battery though. 


Overall I can recommend the T2 if you need a high output flood light in a small package with a choice of tint. It even EDC’s and carries in a front pocket pretty well which I was not expecting for a 21700 light. 


Get the Thrunite T2 on Amazon at the links below. 

Neutral White https://amzn.to/3jVEcUm

Cool White https://amzn.to/30gZeVE


Thrunite is also running a promotion for the T2, limited to the first 50 people. 

1 – Buy ThruNite T2 & leave your unbiased experience on Amazon

2 – Contact review@thrunite.com to get a customer edition T1 – dark green ($45.95 on Amazon?for free, limited to the first 50 people!

Meote FM1 Review (Dazzler or Dud?)

Meote is a new flashlight brand on the market a collaboration between Banggood and one of it’s affiliate marketers. It’s first light is the FM1 and it features quad LED, available in multiple tints, multi color auxiliary LED, an attractive exposed copper and black body and running an 18650 battery. Thanks to Banggood for sending me this light for review. Let’s see if their first light is a dazzler or a dud. 


Watch this review on YouTube: 

Follow me on Instagram: https://www.instagram.com/liquidretro/ 

Join the Facebook Page: https://www.facebook.com/LiquidretroReviews/ 


Packaging and Accessories

The packaging here is pretty nice. It’s a black retail hanging box that looks pretty sharp with a picture of the light on the fron. Inside the light is shipped with foam surrounding the light. Accessories that come with the light a nylon holster that’s branded with Meote’s logo, It clips on to your belt with a clip, and doesn’t have a d-ring. Other accessories include 2 o’rings and a simple manual. The print is very small and I would suggest just going to ToyKeepers website to get a larger copy of the Anduril manual. 


Construction & Build

There are 2 versions of this light. First is the version I have here with the LH351D LED (Other LED’s are available), coated copper head and Andruil firmware. There is then the aluminum alloy version with anodized accents (Blue and Green), with NarsilM firmware.  The version I have here is available with the black anodizing, blue or sand. 


This light is built a little differently than other lights, it takes design elements from the FW3A but puts it’s own larger spin on them. Starting at the tail the mechanical switch has a metal button with the Meote logo etched in. It’s a loud button, probably the loudest I have. Inside it features a dual spring but they are rather weak which causes the light to shut off if bumped moderately when on. Inside the body section there is an inner tube that’s not secured one either end. Threads are square cut, raw and a bit rough. 

Body section has some basic grooves cut into it. The body section doesn’t split where you think it should when lining up with the head, instead it’s just behind the copper part of the light. The head itself has a large outer copper sleeve with fins milled in. They are coated to prevent oxidation. On mine it seems to be missing an oring but there is a place milled for it. Inside there is an anodized aluminum large retaining ring holding the pill in. The bezel is aluminum and crenulated holding in the quad optic. 


It’s worth noting here that at least with my flat top, unprotected high drain VT6 battery, it’s very easy to bump the light and have it turn off. A stronger/longer tail sprint would fix this.


Size & Weight

I measured the length at 110mm, minimum diameter on the body at 21.4mm, and maximum diameter on the head at 30mm. I measured the weight with a Sony VTC6 battery at 185.5g. It’s not a light light.

Retention

The light does feature a reasonably deep pocket clip with large cap screws with a 3/32 hex head. Not typical of other flashlights. My clip was originally bent out from the body of the light and didn’t make contact. I was able to bend it back fairly easily as it’s soft steel. It also comes with a nylon case that’s decent. It has a clip on the rear instead of D-Ring.


LED & Beamshots

The FM1 is available with a number of LED’s, the one I have here is running Samsung LH351D at 5000k. I think it’s a bit warmer then that in my eyes and when compared with other lights. SST20 at 4000k and XPL-Hi at 6500k are also available. Meote claims the light produces 4980 lumens and that number is probably with the XPL-Hi LED’s but testing on BLF has said otherwise. I don’t have a current method I trust to accurately make a lumen claim myself.

Beam pattern has a decent amount of artifacts that you notice on the edges of the spill. I think it’s the crenulations that are causing most of this. Out of my D4 and FW4A it’s what I would consider the most undesirable beam shape. It’s mostly a floodly light and at a distance you don’t really notice a hot spot. 

There have been several reports of the driver on this light flickering during high output uses. My example doesn’t have that problem at least when I am running a Sony VTC6 battery. It’s worth noting here that at least with my flat top, unprotected high drain VT6 battery, it’s very easy to bump the front or back of the light and have it turn off. A stronger/longer tail sprint would fix this.


Heat and Runtime

No big surprises here in the heat and runtime category. It’s a quad LED light without a ton of thermal mass so Turbo output starts stepping down almost immediately and at 30 seconds it’s 3.5 times less light then when it started turbo. It does have active thermal regulation so we saw it step up and down slowly during the total 2 hour and 40 minute run time. Most of this was spent between 25%-40% relative output. FL1 was at 2 hrs and 32 minutes. Maximum heat I saw was 47C at the 12 minute mark. LVP came in at 3.02V.

UI

The Meote FM1 is using the Andril firmware we have gone over before with several other lights I have reviewed like the Lumintop FW3a, FW4a, FireFlies E07 and others so I will be brief. It provides the ability to run in a nice ramping mode, stepped mode, and has tons of extra features. Do seriously check out the diagram and practice with it so you use the light to the full potential if you decide to get one. I would also recommend doing a thermal config if you plan to use the light seriously. 


One thing some of the other lights I have reviewed have not had are the RGB auxiliary LED’s that this one does. You can adjust the brightness to low, high, or in a blinking color mode by 7 quick clicks when the main led are off. You can also adjust the color of the LED, with 7 click then hold from off. It can do static colors R, Y, G, C, B, V, W, rainbow which I have it in here, and volts mode which gives you a quick flash of the previous color then fades to the next. 


Pro’s

  • Use of the Samsung LH351D LED’s is nice
  • Exposed copper even though it’s coated
  • Auxiliary LED’s


Con’s

  • Internal Build quality 
  • Beam Pattern
  • Easy to bump and have the light turn off
  • Clip is easily bent


Conclusion

On paper I wanted to like ths light, It’s a little bigger than I typically want to EDC in the summer but I just liked the look of the exposed copper, it had a pretty good deep carry clip, high CRI LH351D led’s that are warmer, and aux LED’s are always fun too. So this had the potential to be a good light, but when I got my hands on it turned out to be a light I just didn’t enjoy very much. 


I have a hard time recommending this light. There are better options like the Lumintop FWXA series and Emmisar D4V2 for lights that do similar things. These don’t have the issues like this FM1 has, like a bump shuts the light off, the interior build quality, a flickering power issue some people on BLF have reported, a clip that’s not touching the body, and an undesirable beam shape. 


To me it feels more like a prototype than a finished product. A lot of these issues should have been caught during the development process and worked out before bringing it to market. Instead we are left with a light that just isn’t as good as it should have been.


Banggood is offering 20% off the Meote FM1 using https://ban.ggood.vip/Ugny and coupon code BGCP1PC

See Banggood’s other July Flashlight sales https://bit.ly/3jGzsSl